Lesson 4
The Art of Broom Making
Welcome to our last lesson! For this lesson, we will be making our very own, first brooms. Together with our knowledge of the history of broom making and a plan based on decisions we made in the last lesson, we are now ready, at least with what we want, for broom making. Here we go:
Note: The steps mentioned here is taken from John Holzwart’s broom making site and is adjusted, somehow, to suit the context and needs of the wizarding world and its magic. The italicized words below was taken directly from the site and not changed at all. The illustrations used are also properties of John Holzwart and were taken from his site. I do not own the steps below as well as the pictures used. I would like to thank http://www.motherearthnews.com/Do-It-Yourself/How-To-Make-A-Broom.aspx for all the information.
Broom Twigs
As mentioned in the past lesson, a wizard’s broomstick is more adaptable on whatever material you use for the broom twigs or bristles because of the capability of magic to hold or attach it to the handle. As a result, whether it is birch or corn (Muggle uses broomcorn) or whatever, the key is the charm used to attach the two together. However, here is some more information relating to broom twigs:
Standard number of twigs used in broom making is 28 pieces for the inside layer and 17 pieces for the outside layer. Also, the standard length of each twig is one cubit, that is, the length between the elbow and the longest finger. Though these numbers are just the standard, one cannot be limited to it. One can experiment on the length and the number of the twigs, depending on the physical characteristics you want for your broom as well as its performance you desire.
In preparing the bristles or the twigs, you cut them differently, depending on where you want them in your broom. Twigs for the inside layer are cut shorter than those for the outside layer to give way for the plaiting. Place the freshly cut twigs in a bucket of water with the cut ends submerged for 15 minutes. You can use the Aqua Eructo Charm or the Aguamenti Charm to guide you in this stage.
Assemble the following materials: the broom twigs, nylon chord (for tying), hemp string (for sewing), handle (standard length of 18 inches). Some of the tools to be used are foot held apparatus, scissors, knife, large needle, sewing clamp, lighter and drill. Some of these materials and tools are not necessary for a wizard with the help of the wizard’s wand.
The Handle
18 inches is the standard length of a broomstick. However, one can experiment on it, on its effects to the broom. The wood must be dried for at least six months. For us wizards, we can apply the Hot Air Charm for 45 minutes. It the wood peels or shrinks, reject the wood as it has low quality and not good for broom making. However, if it passed the Hot Air Charm test, you can use it for your broom. Drill an 8-inch hole near the end of the wood for the string to be tied to the handle. A very small force of wind from a Deprimo Charm would do it; just be sure to be gentle enough in doing this or you’ll crack the wood itself.
Cord
The next step is to choose the nylon cord and to wrap it around the apparatus that will be used to create tension when tying the broom. Some simply use a stick, but the spinner is preferred as it keeps the string from rubbing on the ground. The standard nylon used is #18 nylon cord or larger. However, you can be flexible as the magic will adjust on everything at the end.
Tying the Broom
After tying the string to the handle, begin by placing the inside layer of broomcorn. The heads are placed one at a time under the string, below the knuckle on the brush. They are secured with a tug on the cord. After one inside layer has been placed around the stick, a second inside layer is added. The next step is to tie the outside layer. First, trim the ends from the first two layers, tapering the material toward the handle. Be careful not to cut the string. You can also use the Severing Charm (Diffindo) in cutting or trimming the first two layers already mentioned.
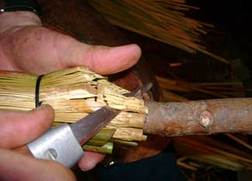
Trimming the ends of the inside layers the Muggle way
Wind the string around the stalks until it's on the handle; then, add the outside pieces. Place the outside layer of broomcorn heads with the pith (concave) side to the handle.
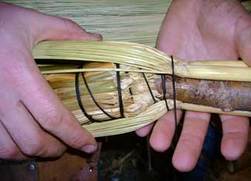
Adding the outside layers
Like the other layers, place them one piece at a time. The string should compress the material. When the top layer has been placed all around the handle, wind the string around the broom at least eight times.
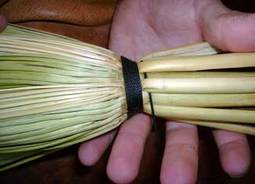
Tying the broom
Plaiting
The next step is the weave or plaiting. You can omit this step by winding over the stalks and making a band at the top just like the first band of string. This is done using a weaving technique, moving the string over and under alternating stalks.
The next step is the weave or plaiting. You can omit this step by winding over the stalks and making a band at the top just like the first band of string. This is done using a weaving technique, moving the string over and under alternating stalks.

Plaiting
Finish the last wind around and hold the string with your thumb. Cut the cord and put the end through the nylon loop. Then pull the nylon loop to hide the end of the tying cord. That finishing bit is called a “blind knot.” Cut the frayed cord hanging from the piece to about an eighth inch long and singe it with a lighter. Of course, for us wizards, we can make a fire through the Incendio Charm, making it easier for us.
Sewing
Now the broom looks like it's having a bad hair day: It hasn't been sewn yet. Waxed hemp is preferred for sewing brooms. The hemp comes in a variety of colors, and the wax holds better. For making a flat broom, you'll need a sewing clamp (two boards held together with bolts and wing nuts).To make things easier, you can use the Straightening Charm in straightening the bristles as well as the Tail-Twig Clippers that is a part of the Broomstick Servicing Kit.
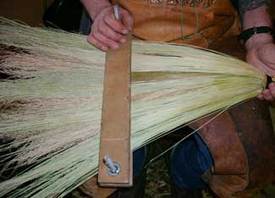
Sewing the Muggle way
Finishing Up
To finish, cut the bottom of the broom flat and thread a leather strip or piece of jute cord through a hole in the handle to hang the new broom. Again, Diffindo can be used in trimming the bottom of the broom flat. Also, in finishing up a broom, here is when you can focus your mind in adding some protective enchantments, adding some features and checking some minor problems on the broom. Once you are done, you can test your creation and then improve it more through the years that it will be out in the market.
Making brooms involves a lot of steps and manual working of the hands. However, more charms can be incorporated to the process; some not still discovered. This proves to us that broom making can still go a long way as a career. It has a lot of rooms to improve, making the roles of broom makers crucial in the process as many decisions and features can still be added to the process and to the broom eventually, shaping the broom to really manifest its creator’s vision.
Hope you enjoyed the class! Off to your exam and project! Go and make some brooms!
